
気付かないうちに、怖い顔になっていませんか。それとも、ニヤニヤしすぎていませんか。AIに客観的に評価してもらいましょう!
原理
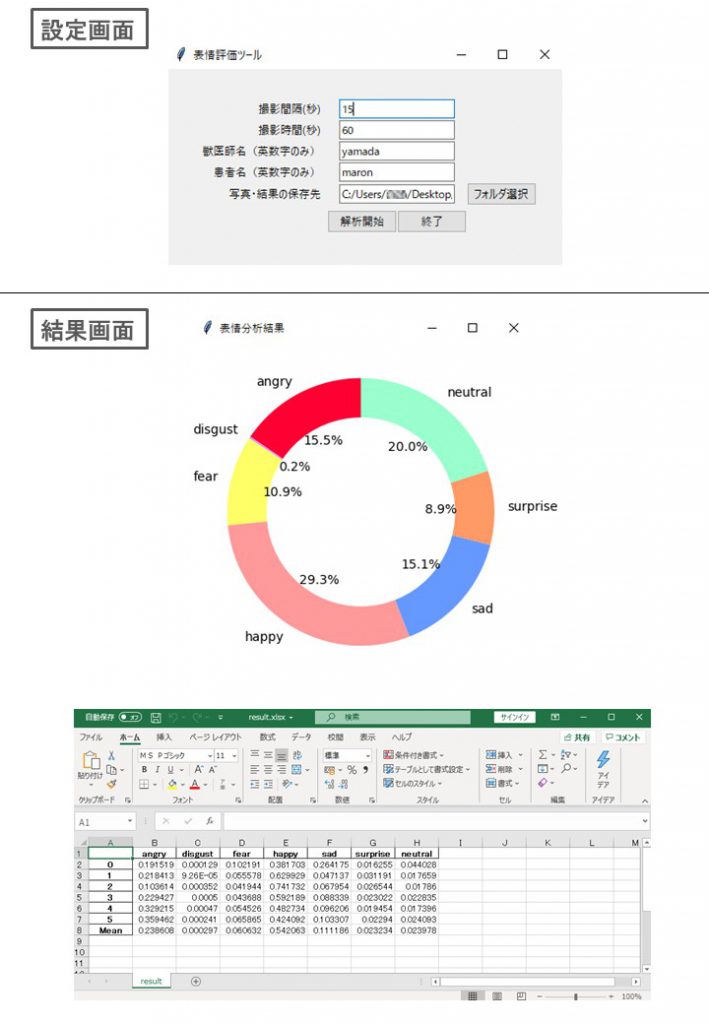
パソコンに内蔵カメラもしくはUSBでつないだwebカメラを使って顔を撮影し、分析して怒り、むかつき、恐怖、幸せ、悲しい、驚き、中性で評価します。
ドキュメントが多いので人をやりましたが、次は犬の表情をやりたいです!pythonを使っていますが、pythonを使うまでのパソコンの環境設定がめんどくさいです。動かないパソコンもたぶんあると思います。どうしても1クリック化(exe化)できませんでした。できる人教えてください。
中身は、tensorflowと表情学習済みモデルを使用しています。
(https://arxiv.org/abs/1710.07557)
使い方
1. 後述の方法で起動する。
2. 写真・結果の保存先を選択。必要に応じて撮影間隔・撮影時間・獣医師名・患者名を修正。
3.解析開始を押す。撮影時間が経過後も解析が行われているのでそのまましばらく待つ。
4.解析結果の画面が出てきます。
5.さきほど選択した保存フォルダに、写真と結果がエクセル形式で保存されています。
初回の起動方法
1.以下のファイルをコピペして作って下さい。
from tkinter import *
from tkinter import ttk
import tkinter
import cv2
import os
import time
import pandas as pd
import matplotlib.pyplot as plt
from matplotlib.backends.backend_tkagg import FigureCanvasTkAgg
import numpy as np
from keras.models import load_model
from keras.preprocessing.image import ImageDataGenerator
from keras.preprocessing import image
import glob
import openpyxl
import datetime
from tkinter import filedialog

# not to show an error message related to CPU
os.environ['TF_CPP_MIN_LOG_LEVEL'] = '2'

# close the tinker window
def _destroyWindow():
    root.quit()
    root.destroy()

def askfileplace():
    cd =  filedialog.askdirectory() # ask which directly to use for saving image and excel
    path.set(cd)

def resource_path(relative_path):
    try:
        base_path = sys._MEIPASS
    except Exception:
        base_path = os.path.dirname(__file__)
    return os.path.join(base_path, relative_path)

# create the function which will be used for pressing botten
def save_frame_camera_key(device_num,interval1,duration1,vetname1,name1,path1):

    os.makedirs("{}//{}_{}".format(path1,vetname1,name1)) # create a folder to save above
    cap = cv2.VideoCapture(device_num) #create a videocapture object

    if not cap.isOpened():  # check if it has been opened
        return

    n = 0 # increment initiated with 1
    while n <= int(duration1)/int(interval1) :  # calculation of the terminating point of the increment

        ret, frame = cap.read() # read the object which returens two variables
        # cv2.imshow("Analyzing emotion", frame) # show the window
        cv2.imwrite("{}//{}_{}//{}.jpg".format(path1,vetname1,name1,n), frame) # save the pictures
        time.sleep(int(interval1)) # wait for interval
        n += 1 # increment

    # cv2.destroyWindow("Analyzing emotion") # after the while snipet, close the window

    image_paths = glob.glob("{}//{}_{}//*.jpg".format(path1,vetname1,name1)) # get the jpg files in the folder

    result=[] # create a list for stucking the results

    for image_path in image_paths: # process each file in the jpg files
        img = image.load_img(image_path, color_mode="grayscale" , target_size=(64, 64)) # convert it to grayscale
        img_array = image.img_to_array(img) # convert it to array
        pImg = np.expand_dims(img_array, axis=0) / 255 # make it between 0 ~ 1

        # read the face recognision trained model hdf5
        model_path = resource_path(".//fer2013_mini_XCEPTION.110-0.65.hdf5")
        emotions_XCEPTION = load_model(model_path, compile=False)

        prediction = emotions_XCEPTION.predict(pImg)[0] # predict a image using the model
        result.append(prediction) # append the result to the list named result

    df = pd.DataFrame(result) # convert it to DataFrame
    df.columns=['angry','disgust','fear','happy','sad','surprise','neutral'] # name the columns
    df = pd.concat([df,pd.DataFrame(df.mean(axis=0),columns=['Mean']).T]) # create a mean row on the bottom
    df.to_excel("{}//{}_{}//result.xlsx".format(path1,vetname1,name1), sheet_name='result') # save a excel file

    # create a graph using mtplotlib
    fig = plt.figure() # create object
    ax=fig.add_subplot(1,1,1) # create subplot indicating the place of the subplot
    mycolor = ["#ff0033", "#cc99ff", "#ffff66", "#ff9999", "#6699ff", "#ff9966", "#99ffcc"] # create a list for color
    ax.pie(df.tail(1).values[0],labels=df.columns,counterclock=True, startangle=90, autopct="%1.1f%%",colors=mycolor) # create piechart
    centre_circle = plt.Circle((0,0),0.7,color='white', fc='white',linewidth=1.25) # make it donuts shape
    fig = plt.gcf() #get current figure
    fig.gca().add_artist(centre_circle) # get the current axes and cover the white donuts on the pie chart

    # Create new window by Tkinter Class
    root = tkinter.Tk()
    root.title("表情分析結果")
    root.withdraw()
    root.protocol('WM_DELETE_WINDOW', _destroyWindow)  # When you close the tkinter window.

    # Canvas and put the figure to the canvas
    canvas = FigureCanvasTkAgg(fig, master=root)  # Generate canvas instance, Embedding fig in root
    canvas.draw()
    canvas.get_tk_widget().pack() #canvas._tkcanvas.pack()
    root.update()
    root.deiconify()

# create interface
root = Tk()
root.title('表情評価ツール')
root.resizable(True, True)

#create text
frame1 = ttk.Frame(root, padding=(32))
frame1.grid()

label1 = ttk.Label(frame1, text='撮影間隔(秒)', padding=(5, 2))
label1.grid(row=0, column=0, sticky=E)

label2 = ttk.Label(frame1, text='撮影時間(秒)', padding=(5, 2))
label2.grid(row=1, column=0, sticky=E)

label3 = ttk.Label(frame1, text='獣医師名(英数字のみ)', padding=(5, 2))
label3.grid(row=2, column=0, sticky=E)

label4 = ttk.Label(frame1, text='患者名(英数字のみ)', padding=(5, 2))
label4.grid(row=3, column=0, sticky=E)

label5 = ttk.Label(frame1, text='写真・結果の保存先', padding=(5, 2))
label5.grid(row=4, column=0, sticky=E)

# create textboxes
interval = StringVar()
interval_entry = ttk.Entry(
    frame1,
    textvariable=interval,
    width=20)
interval_entry.insert(0,"2")
interval_entry.grid(row=0, column=1)

duration = StringVar()
duration_entry = ttk.Entry(
    frame1,
    textvariable=duration,
    width=20)
duration_entry.insert(0,"10")
duration_entry.grid(row=1, column=1)

vetname = StringVar()
vetname_entry = ttk.Entry(
    frame1,
    textvariable=vetname,
    width=20)
vetname_entry.insert(0,"vet")
vetname_entry.grid(row=2, column=1)

name = StringVar()
name_entry = ttk.Entry(
    frame1,
    textvariable=name,
    width=20)
name_entry.insert(0,datetime.datetime.now().strftime("%Y%m%d_%H%M")) # time
name_entry.grid(row=3, column=1)

path =StringVar()
path_entry = ttk.Entry(
    frame1,
    textvariable=path,
    width=20)
path_entry.grid(row=4, column=1)

path_button = ttk.Button(frame1,text="フォルダ選択",command= lambda : [askfileplace()] )
path_button.grid(row=4, column=2)

# create bottens
frame2 = ttk.Frame(frame1, padding=(0, 5))
frame2.grid(row=5, column=1, sticky=W)

button1 = ttk.Button(
    frame2, text='解析開始',
    command= lambda : [save_frame_camera_key(0,interval.get(),duration.get(),vetname.get(),name.get(),path.get())]) # read the function I made
button1.pack(side=LEFT)

button2 = ttk.Button(frame2, text='終了', command=quit)
button2.pack(side=LEFT)


root.mainloop()
2.githubにアクセスして、fer2013_mini_XCEPTION.110-0.65.hdf5というファイルを、さきほどのpythonファイルと同じ場所に保存してください。
https://github.com/oarriaga/face_classification/tree/master/trained_models/emotion_models
Author: Octavio Arriaga. Thank you very much for your splendid work!
3.Anacondaのコマンドプロンプトを起動します。Macはターミナル。
4.必要なパッケージをダウンロードします。tensorflow使うためには、pythonのバージョンを落とさなければなりません。3.8ではtensorflowを使えません。3.6にしましょう!!
conda create -n face python=3.6.10
proceed ([y]/n)? → y
activate face
pip install opencv-python
pip install pandas
pip install matplotlib
pip install openpyxl
pip install tensorflow
pip install keras
Mac: Terminalで以下を順番にコピペし、1つづつEnterを押していく。
conda create -n face python=3.6.10 anaconda
proceed ([y]/n)? → y
conda activate face
pip install opencv-python
pip install pandas
pip install matplotlib
pip install openpyxl
pip install tensorflow
pip install keras
5.python face.py で実行してください。